A Quick Guide to access QuickBooks files with One Intuit Account

Accessing the QuickBooks Desktop files through one Intuit Account offers complete security of your QB Data files, besides equipping you with the latest features and associated advantages. Are you seeking the steps to access the QuickBooks Desktop files with One intuit Account?
This article has been tailored to provide you with an impeccable walkthrough to help you access and manage QuickBooks files with one Intuit account process. Make sure that you follow the guidelines contained in this article very keenly.
Benefits of Connecting QuickBooks Desktop files to Intuit account
You get the following benefits when you are connecting the Intuit account to your QuickBooks Desktop company file(s):
Additional protection and security.
Access to all of Intuit's products using a single, secure login.
Payroll, payments, time tracking, and other services are also included. Access to these new services and other assorted features and benefits necessitates an additional layer of protection.
Different cases encountered while accessing your Company File
You are required to request your client to include you as an Accountant user in their file. You won't get any Intuit account prompts if you login in with the External Accountant credentials.
On the contrary, if you do not resort to using the QuickBooks Accountant with a company file from your client, you may come across the three scenarios.
Case 1: After logging in to the Company File you are prompted to sign into Intuit
Ask your client to approve your QuickBooks access as a best practice. You don't want to use any information from your client.
If your customer has already linked their Intuit account to the company file, you'll get the User ID prompt. Replace the email address with yours if it isn't yours. Continue by entering your password.
The first time you sign in with your Intuit account credentials, your customer must accept your access. Select OK and request that your customer grant you access.
Note: Before you access, upgrade, or register your QuickBooks for Mac file, you'll be prompted to check in to your Intuit Account.
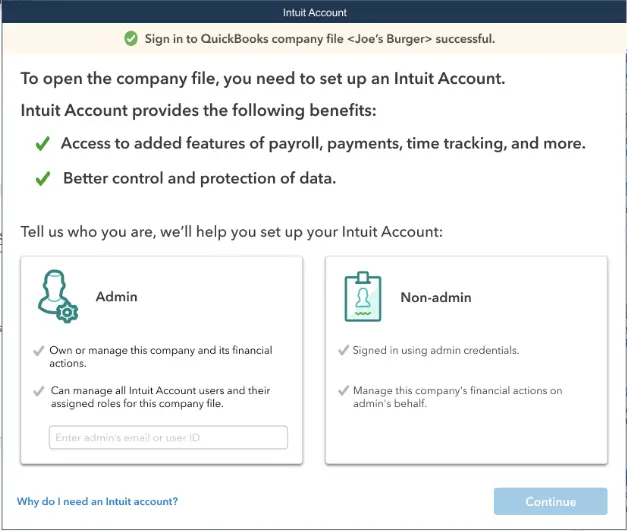
Case 2: You successfully sign into the company file with a request to set up the Intuit Account.
If you see this prompt on the screen, tell your client that they need to connect their Intuit account to their company file(s).
If you're an accountant evaluating a client's file, choose ‘You sign in on your admin's behalf to control this company file's financial actions’, then hit on ‘Proceed.’
QuickBooks requests further information from you in order to assist your administrator in setting up an Intuit account for this file. After you've entered your admin credentials and your personal email addresses, hit on ‘Proceed’, followed by choosing ‘OK’. You can now begin working on your company file.
You should choose ‘You're the admin who owns or controls the company file’ in case you are an accountant taking care of the client's data. Only use this option if you own or manage the business and its finances. Then, after entering your email address, hit on ‘Proceed.’
Sign in with your Intuit account password. You can now begin working on the company file.
Case 3: Not prompted for logging into Intuit
You can access the Company file normally if you aren't prompted for an Intuit account setup or login.
We hope that you got familiarized with all three scenarios and also got know-how of the steps to access QuickBooks Desktop files with One Intuit Account. If you face any difficult scenario, feel free to reach out to our QuickBooks desktop support team via helpline at 1-800-615-2347 for a quick resolution to your issue.


Comments
Post a Comment